> ## Documentation Index
> Fetch the complete documentation index at: https://help.litlab.ai/llms.txt
> Use this file to discover all available pages before exploring further.
# Add and Manage Your LitLab Class Roster in Minutes
> Add students to LitLab manually or sync your class roster automatically via Clever or ClassLink. No student email addresses required.
LitLab gives you two ways to roster a class: add students manually, or sync automatically with Clever or ClassLink. No student email addresses required, either way.
## Two Rostering Methods
Add students one at a time. Works for any class size.
Sync your roster from your district's SIS. Available once your district's Clever or ClassLink integration is set up.
## Adding and Deleting Classes
### Adding a Class
Click **Create a class** from your dashboard and give it a name. Then, add your students.
### Adding Students
From the teacher dashboard, click the class you want to add to.
Type each student's first name (and last initial if you like), pressing Enter to add them one at a time.
Choose a phonics skill for your students to start with. This automatically creates an assignment of 5 stories (max) at that skill for each student added, with recording off by default. Once your students are added, you can assign different skills, turn on recording, and differentiate practice by creating new assignments.
### Deleting a Class
Click the three dots next to the class name and click **Delete**. Only the class's primary teacher (not a co-teacher) can delete it, and deleting a class permanently removes any students who aren't in another active class.
Not sure if you want to delete a class? Archive it instead — archiving works for any class and can be undone, while retaining student data.
### Importing Your Classes
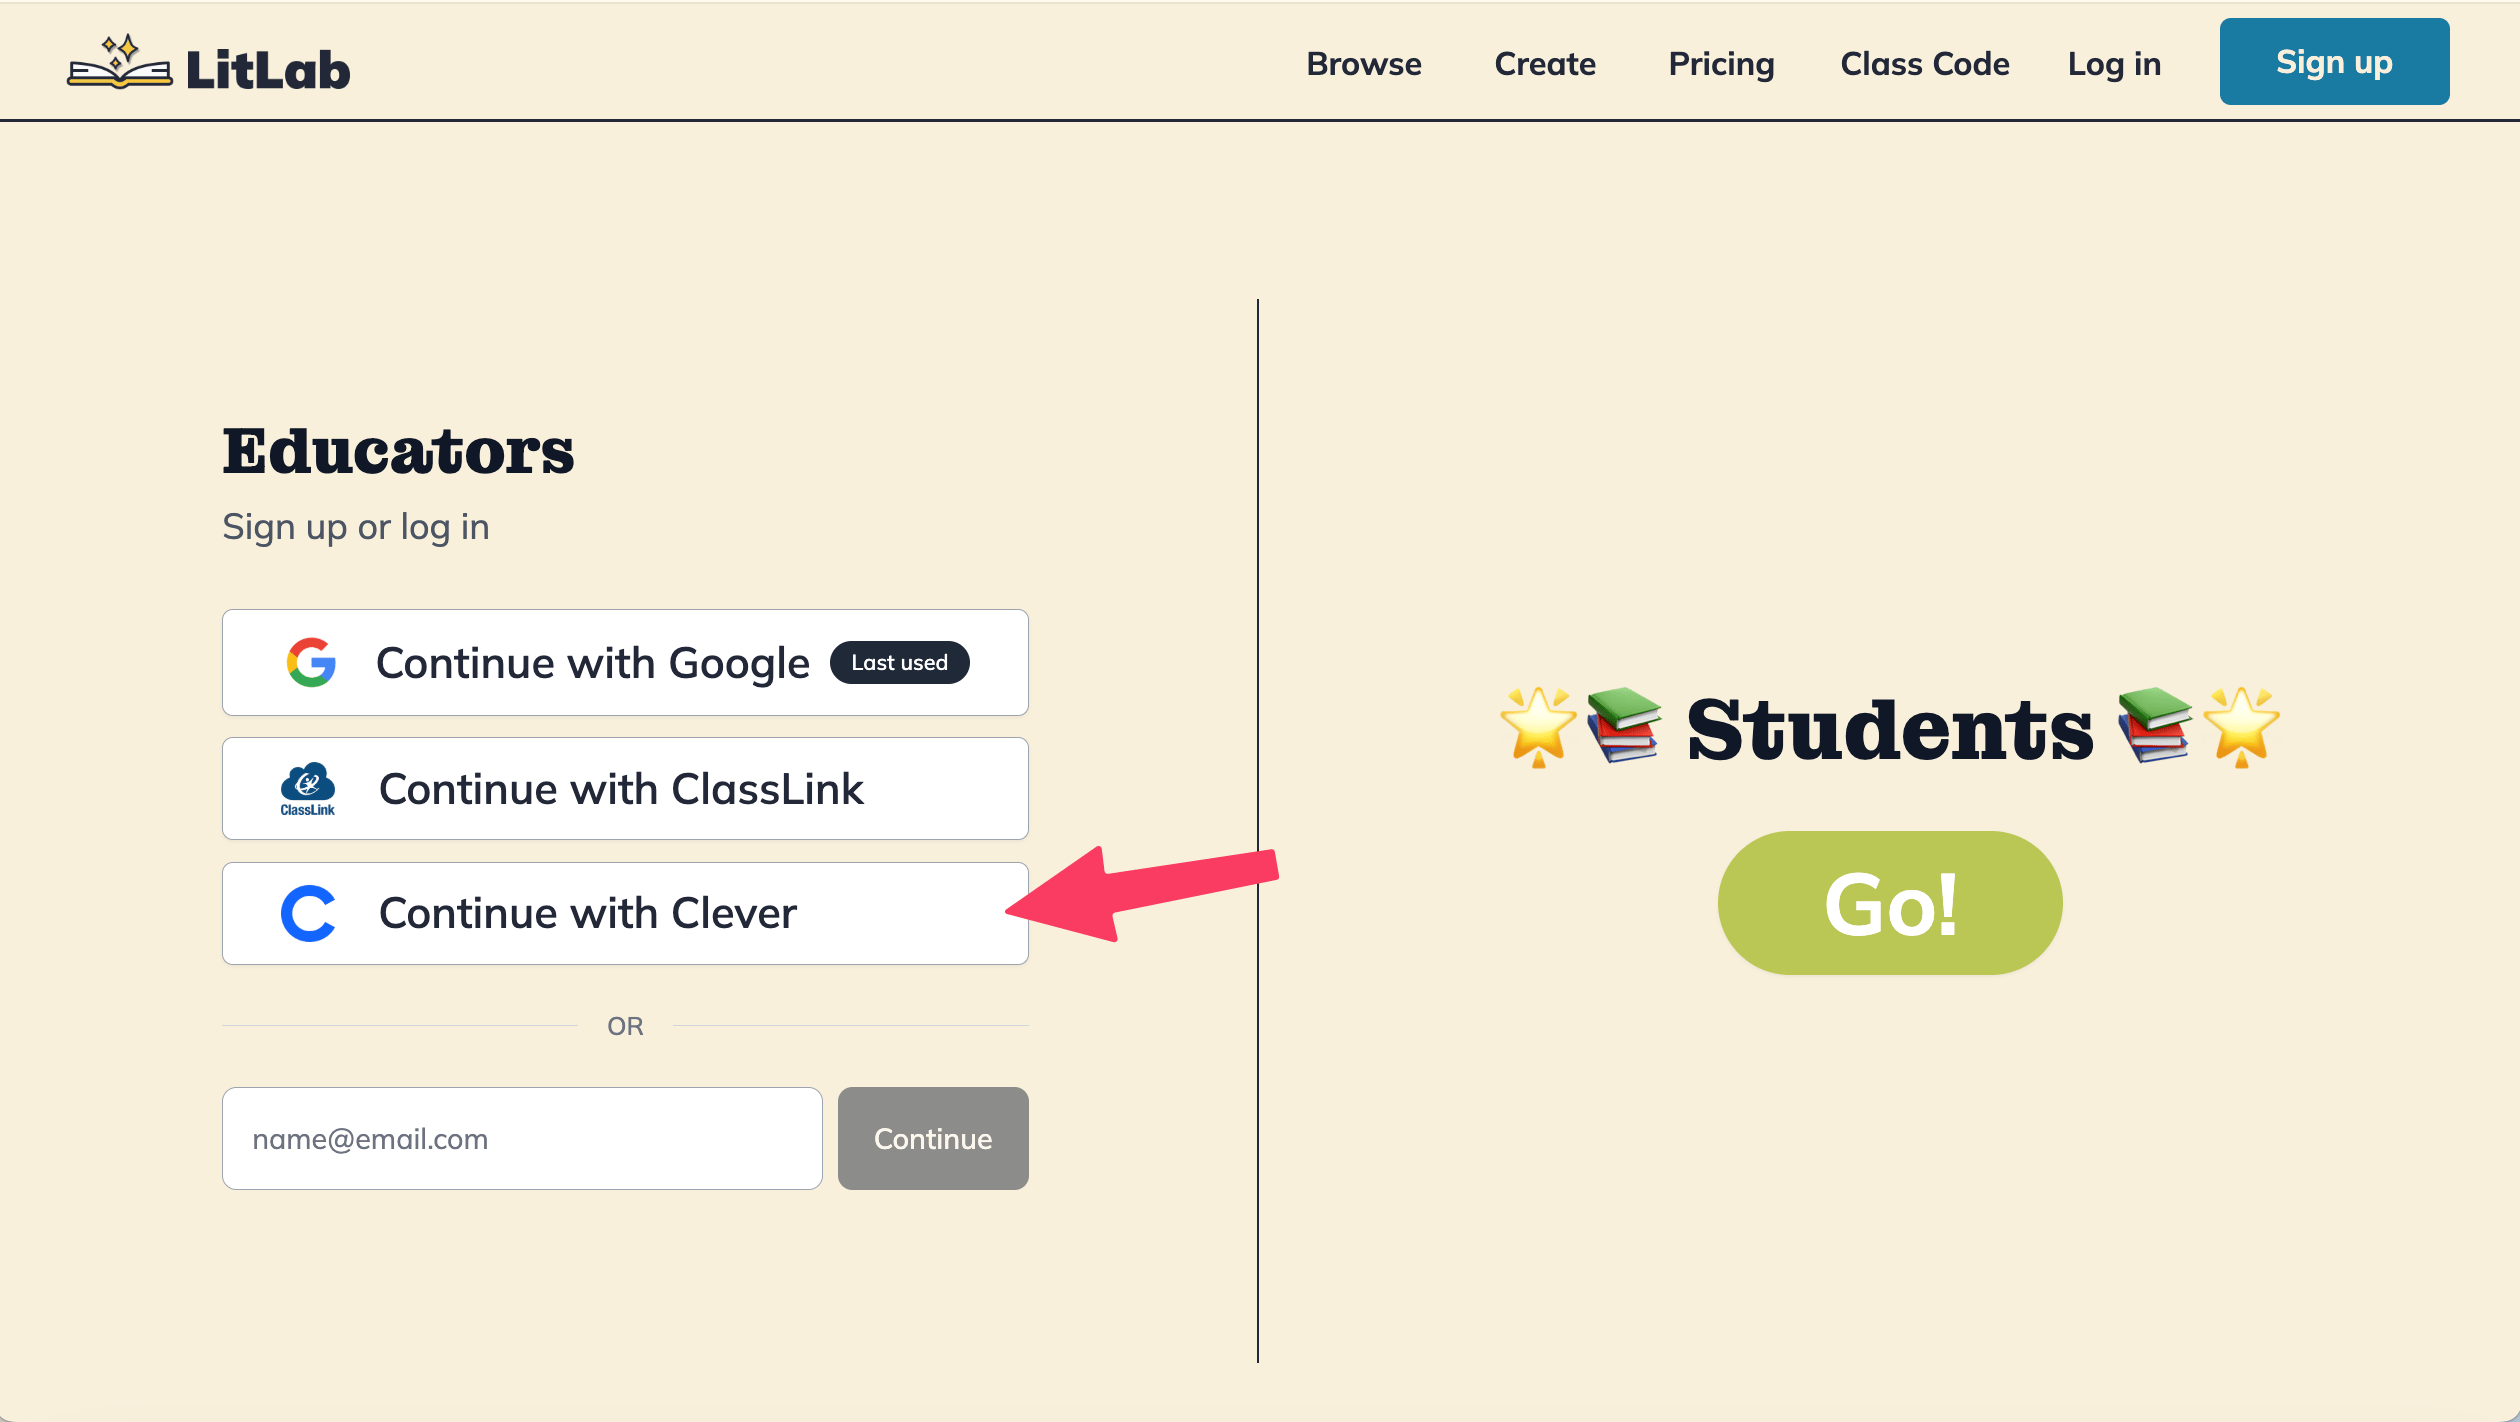
Once your district's Clever or ClassLink integration is set up, sign in with Clever or ClassLink.
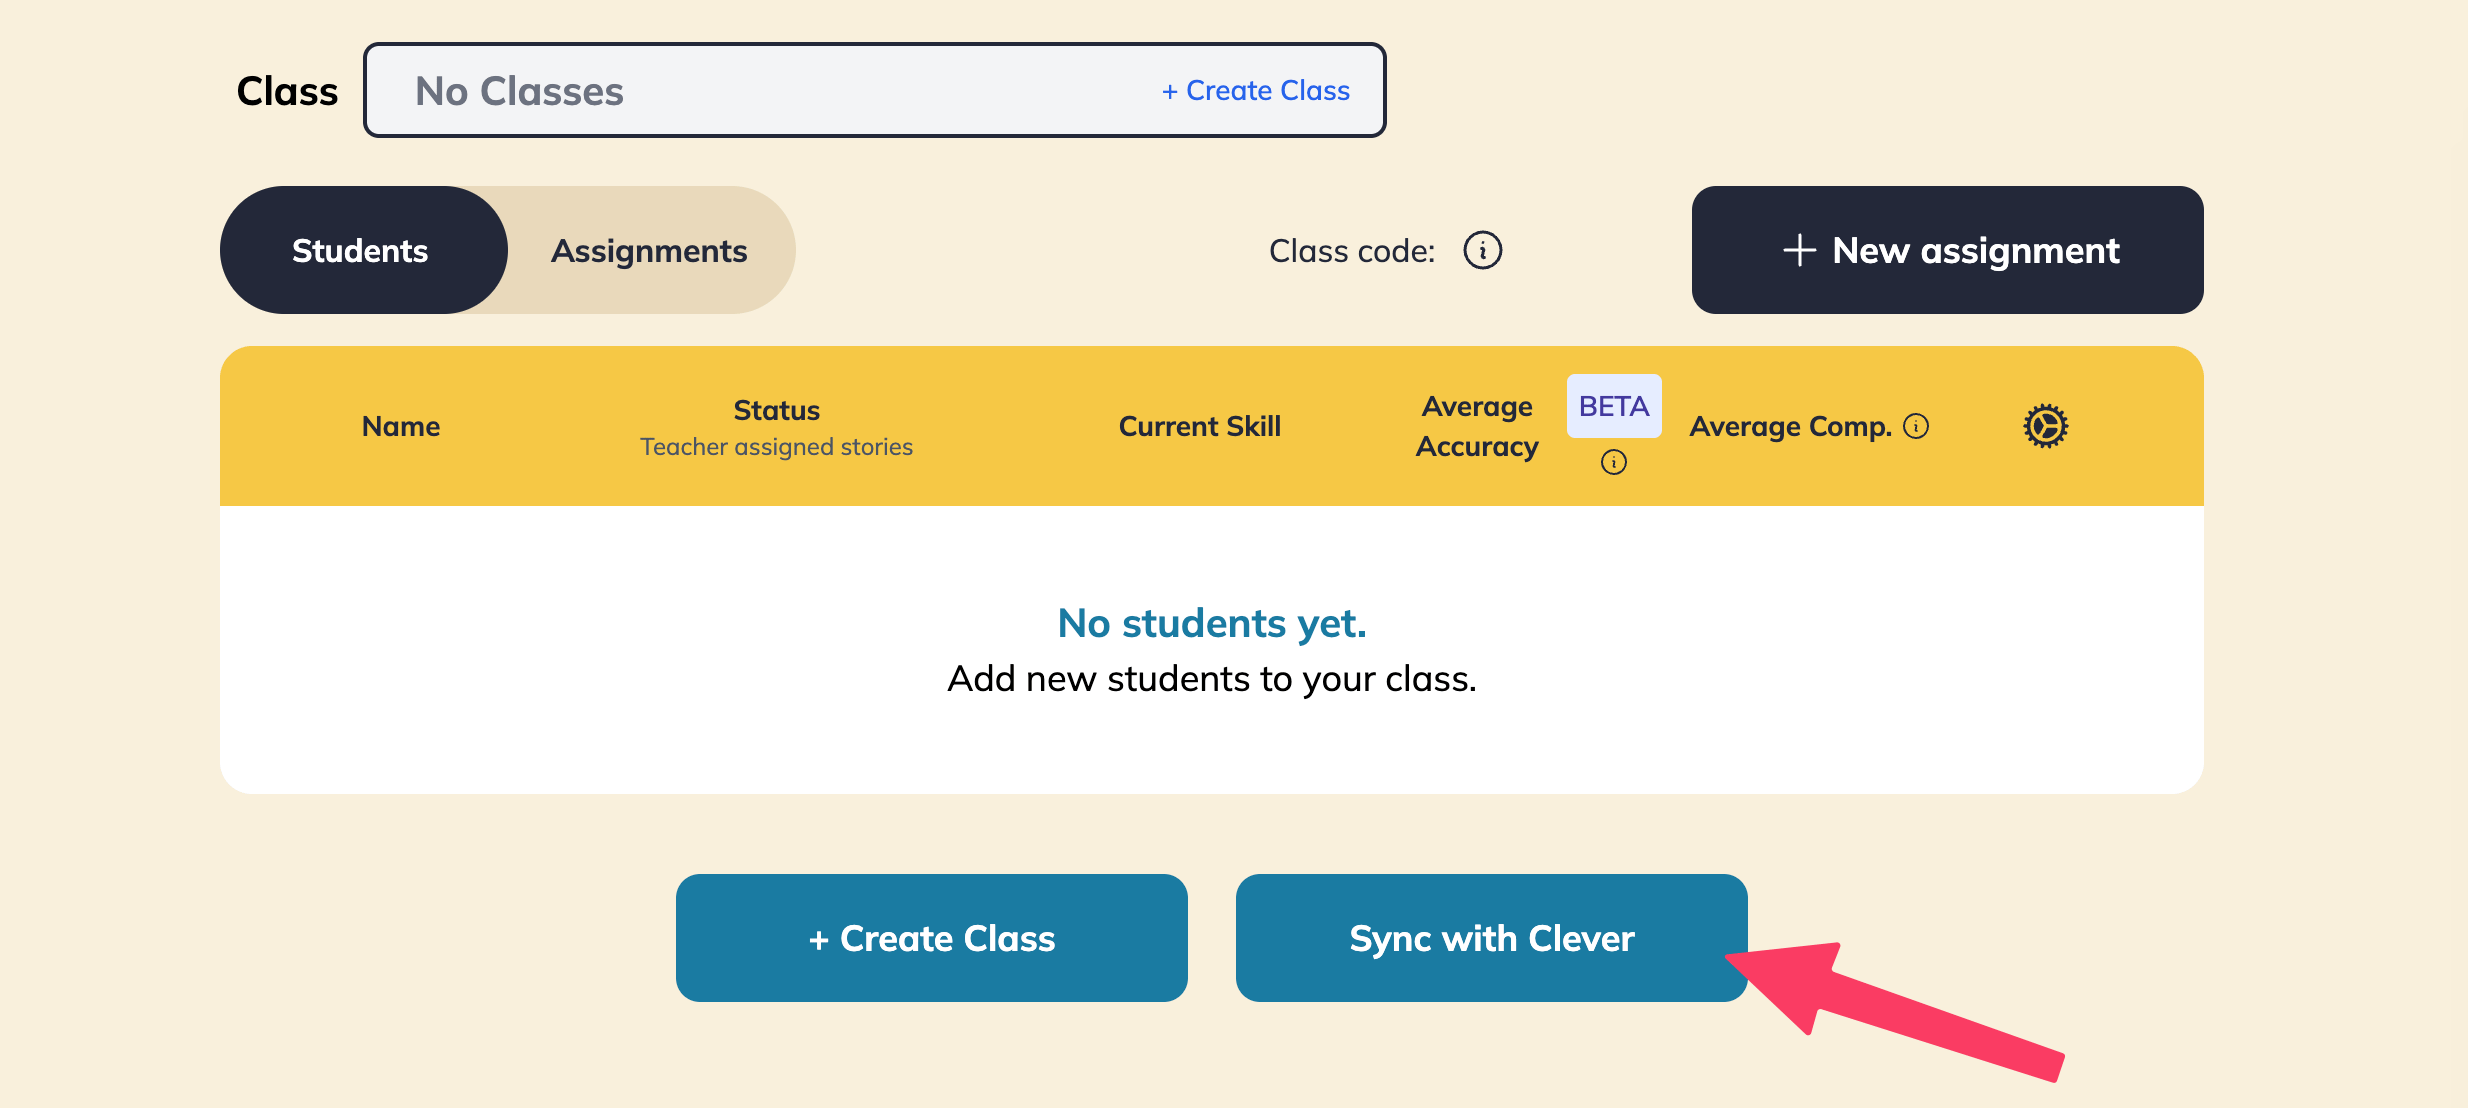
 Then, **Sync with Clever** or **Sync with ClassLink** from your dashboard to import your rostered classes and students.
 See [SSO & Clever](/account/sso-and-clever) for how Clever and ClassLink integrations are set up for your district.
### Re-Syncing Your Roster
If a student is added to your class in Clever or ClassLink after your first import, click **Sync with Clever** / **Sync with ClassLink** — from your dashboard, or from that class's menu as **Re-sync roster** — to pull them in.
Re-syncing only adds — it never removes. New students in the source roster get added automatically, but students who've left the class in Clever/ClassLink aren't automatically removed from LitLab; you'll need to remove them yourself. Existing student profiles, recordings, and assignment history are never affected by a re-sync.
There's no automatic background sync — a re-sync only happens when you (or a co-teacher) click the button.
### Deleting a Class
Clever- and ClassLink-synced classes can't be deleted from LitLab — archive them instead if you want them out of your active view.
## Co-Teachers
Add a co-teacher to share a class with another LitLab teacher — useful for co-taught classrooms, aides, or interventionists supporting the same students.
From your dashboard, open the menu for the class you want to share and select **Set co-teacher**.
Type the co-teacher's email address. They need to already have a LitLab account under that email — LitLab doesn't send an invite if they don't.
A co-teacher gets essentially the same access as you do for that class — they can manage assignments, add students, and see progress data, including recordings. The one exception: only the class's original/primary teacher can delete it.
## Why No Student Emails
LitLab student accounts intentionally don't require email addresses. Students sign in with a class code + name selection. This:
* Removes the COPPA / FERPA risk of collecting under-13 email addresses
* Speeds up onboarding for K–2 students who don't manage their own email
Re-print or re-share your class QR Code or join link at the start of each new term. Students who change devices over a holiday can re-join in seconds.
## Rolling Over at the Start of the Year
The first time you sign in for the new school year (after July 27th, 2026), LitLab will open a short setup wizard that archives last year's classes, imports this year's roster, and picks up your default curriculum in one pass. See [Back-to-School Setup](/account/back-to-school-setup) for what to expect.
See [SSO & Clever](/account/sso-and-clever) for how Clever and ClassLink integrations are set up for your district.
### Re-Syncing Your Roster
If a student is added to your class in Clever or ClassLink after your first import, click **Sync with Clever** / **Sync with ClassLink** — from your dashboard, or from that class's menu as **Re-sync roster** — to pull them in.
Re-syncing only adds — it never removes. New students in the source roster get added automatically, but students who've left the class in Clever/ClassLink aren't automatically removed from LitLab; you'll need to remove them yourself. Existing student profiles, recordings, and assignment history are never affected by a re-sync.
There's no automatic background sync — a re-sync only happens when you (or a co-teacher) click the button.
### Deleting a Class
Clever- and ClassLink-synced classes can't be deleted from LitLab — archive them instead if you want them out of your active view.
## Co-Teachers
Add a co-teacher to share a class with another LitLab teacher — useful for co-taught classrooms, aides, or interventionists supporting the same students.
From your dashboard, open the menu for the class you want to share and select **Set co-teacher**.
Type the co-teacher's email address. They need to already have a LitLab account under that email — LitLab doesn't send an invite if they don't.
A co-teacher gets essentially the same access as you do for that class — they can manage assignments, add students, and see progress data, including recordings. The one exception: only the class's original/primary teacher can delete it.
## Why No Student Emails
LitLab student accounts intentionally don't require email addresses. Students sign in with a class code + name selection. This:
* Removes the COPPA / FERPA risk of collecting under-13 email addresses
* Speeds up onboarding for K–2 students who don't manage their own email
Re-print or re-share your class QR Code or join link at the start of each new term. Students who change devices over a holiday can re-join in seconds.
## Rolling Over at the Start of the Year
The first time you sign in for the new school year (after July 27th, 2026), LitLab will open a short setup wizard that archives last year's classes, imports this year's roster, and picks up your default curriculum in one pass. See [Back-to-School Setup](/account/back-to-school-setup) for what to expect.